The other day, I bought a few things at a pharmacy chain that I frequent. No sooner had my credit card been charged than my smartphone vibrated – I received a PDF copy of the receipt attached to a nice email message thanking me for my purchase.
Now that’s professional. I took two things away from that moment:
1. A customized email with useful information created a nice customer experience.
2. Automation made sure that, no matter who attended to me that day, I would receive the same experience.
Sure, easy enough for big pharmacies. But what about your company? How can you automatically send invoices, reminders, and statements with Dynamics 365 Business Central?
That functionality isn’t easily available out of the box. So, we at ERP Connect Consulting developed the Invoice and Statement Delivery (ISD) extension for Business Central to help you close the loop on the invoice, statement, and payment cycle.
Let’s take a look at what it can do for you.
Powerful and Highly Customizable
From the Administration screen of the ISD extension, you have the ability to define custom parameters for invoices, credit memos, payment receipts, statements, and past-due reminders.
Customizable Text with Rich Formatting
You can customize the subject line and the body text for each document type, and use dynamic text variables to automatically insert the customer name, document number, amounts, due dates, and other useful custom information automatically. The email body text editor even allows rich text, letting you create professional correspondence and include pictures, logos, links, and more.

File Attachments
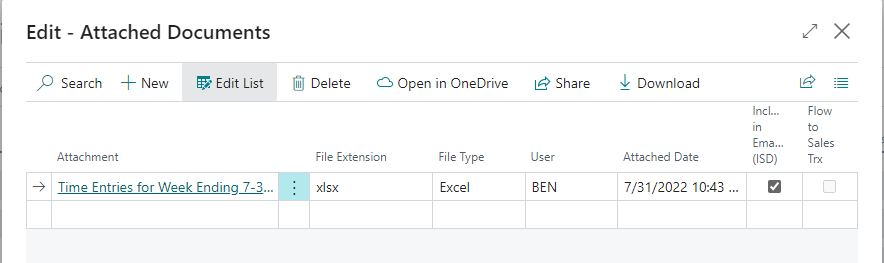
There are times when you want to include other files with an invoice, payment receipt, etc. For example, you may wish to send a separate timesheet, giving a detailed breakdown of time spent on a project, to go along with the invoice in which the time is billed. You can easily accomplish this by attaching the file in Business Central and checking the box “Include in Email (ISD)”.
Additionally, you can opt to receive a CC email to monitor outgoing messages indefinitely, or remove the CC address later once you’re confident the process has been configured to your liking.
Powerful Dashboards and Configurable Intervals
Invoices, credit memos, payment receipts, and the like can be sent out upon posting, or optionally held in a queue to be verified and sent from their respective dashboards. These dashboards let you see at a glance when the email has been sent, by whom, as well as details about the individual documents. You can even preview the invoice before sending to ensure accuracy. All of this helps your AR department stay on top of these vital customer communications.

Some documents, such as statements and past-due reminders, can be configured to go out automatically at any interval you specify. Here are some examples:
- Perhaps 2 days before an invoice is due, ISD can resend the invoice and remind the customer.
- Every 5, or maybe 7 days after an invoice has come due, a reminder can be sent to encourage the customer to pay promptly.
- At the customer level, you can specify whether they receive statements. And if they do, you can choose to have them sent weekly, monthly, or whatever cadence fits their needs.
- As a side note, when sending out statements, you can optionally include the corresponding invoices in the attachments, giving your client a complete picture in one email.
Edit Posted Documents
Another special feature of ISD is the ability to update certain fields on posted sales documents. If you didn’t correctly set the payment terms, the salesperson, or the customer, you would have to void the document and create a new one. However, ISD lets you modify those fields, and more.

User Level Security
Keep this functionality in the right hands. With user-level security settings, you can grant (or revoke) access to the various dashboards available, and also allow a user to make limited edits to posted documents.

Benefits of Using ISD
Automatic and personalized emails to your customers help you deliver a superior customer experience through consistency. They remain informed about their purchase and payment activity, and you benefit as well – most customers will pay more quickly with timely reminders.
You also benefit from time saved. Automating common tasks, such as sending out documents via email, frees up your Accounts Receivable staff, allowing them to focus on other, more valuable activities. Fixing minor errors on documents, rather than recreating them, also helps you move on to the next task faster.
For just $900/yr, your AR department can potentially save hundreds of hours while decreasing your average collection days. We are confident you’ll agree, so we’re offering you the chance to try our Invoice and Statement Delivery extension for 30 days at no charge. Download our tool today from our website, or from AppSource, and generate a demo key from the administration screen to get started.
Would you like to learn more about this useful tool? Visit the product page, watch the following video demonstration, or read the transcript that follows.
We can help you configure this extension, and we also have a host of other useful tools. Contact us today and let us show you how to increase your productivity with Dynamics 365 Business Central.
Demo Video and Transcript
Hello, everyone. This is Ben with ERP Connect Consulting and in this video, we are going to walk you through how to use our Invoice and Statement Delivery extension. After downloading our extension from AppSource or our website, the first thing you’re going to want to do is to navigate to the Invoice and Statement Delivery setup window through the search bar here. You can start by typing ISD and this is going to take you to all of our different options for our ISD extension. The first of which you want to come to is this administration window for the setup. Once I click on the setup, you’ll see a handful of different modules, which we’ll talk about here in a second, but the first thing you’ll want to do is make sure your activation is generated here, which you’ll do by going up to process and clicking, “Generate demo key.”
What this will do, after you download it, is allow you to use our product for free for the first 30 days, after which you will need to reach out to get an activation key. We offer both a yearly license, as well as a one-time perpetual license. Depending on what you’re looking for, let us know, and we’ll get you those activation keys once your trial expires. After everything’s set up there, you’re now active and able to use the Invoice and Statement Delivery tool, to which you’ll want to come into this setup window first, as we previously mentioned. Once you’re here, you’ll see a handful of different fields, the first we want to touch on is this test email address. You’ll notice that I have this populated with my email address right now. What this is going to do is, basically, going to override all of the email functionality in the system at a customer level, and send everything to me.
This is great when you’re testing for the first time or doing a demo like I’m doing today. If this was blank, for example, then we wouldn’t be in test mode, and it would actively send out all invoices, credit memos, payment receipts, statements, and past due reminders to the email that’s on the customer card. Again, we’re going to leave my email in there for today as we test. The next general piece of information here that we’ll touch on before getting into the functionality of the tool is the, “Allow Attach Doc in Email.” I’ve got this turned on, I’m always going to leave this on for our demo today. What this is going to allow me to do, in the case of an invoice, for example, is attach additional documents to the unposted sales invoice, which will flow through to the posted document. You can also add the attachments to the posted document after the invoice has already been posted.
No worries if you forget, you can go ahead, do that, and we’ll talk about how that works on the invoice. We’ll always send the PDF of the invoice, but this, “Allow Attach Doc in Email,” is going to be for all those extra files that you also want to send to your customers when using the ISD tool. Without further ado, let’s jump into our first module here, which is the invoices. What this tool’s going to let us do is… It’s really going to enhance a lot of the email invoicing functionality that already exists in the system. We know today that we can send emails out of the system, however, it seems very tedious and very manual sometimes, we’ve got to click through a lot of dialogue boxes. What our tool’s going to allow you to do is really streamline that process and either send those emails directly when posting, you’ll see that field over here, “Email Upon posting,” which we’ll talk about in a second, or you can send these from a dashboard.
An important thing to note is that, when emailing upon posting or emailing through the dashboard, there are no dialogue boxes that you have to click through. It’s very efficient and you can send either one email for one document, or you can do a multi-select and send multiple invoices across multiple customers, all at the same time, with just a click of a button. We’ll get in there in a second, but I do want to start with some of these fields. We got the CC Address on the invoice. Anytime I’m invoicing my customer… I got a lot of different customers, I’m sending them all invoices, but I do want to have a paper trail of that myself. I’m going to put myself as the CC, anytime those emails go out, I’m also going to get an email since I’m CC’d, and it’s just going to ensure that everything’s flowing very smoothly.
If later you find that everything’s configured exactly as you please, you can eventually remove yourself from the CC, or just leave yourself there indefinitely, as a double check as you’re continuing to use this going forward to make sure that you’re getting all those emails, as well. The second piece is this, “Report ID Filter.” What the Report ID Filter’s going to let you do is select all the different email templates that you might be using, put those on here, and that will allow you to use those when sending emails out, either upon posting or from our dashboard. These next two fields are very important, this is what your customer’s going to see when they receive the email. First, we have, “Email Subject.” Pretty intuitive here. We got a few different fields, we can dynamically populate. If I hover over here, it’s going to give me more information on what those do.
My one, that’s going to be replaced by the company name, my two is going to be replaced by the invoice number, and the three is going to be replaced by the cell two customer name. In this case, my subject would read, as it’s going out to a customer, “ERP Connect Consulting dash sales invoice, number 1234,” perhaps and the three is going to be replaced by the customer. The end customer’s name is going to go within those parentheses, so when they receive the email, they’ll see, “Okay, this is from ERP Connect Consulting, this is my invoice number, and it has my name on it, so I know that it’s coming into the right place.” The next piece is going to be this email body memo. If I click on the, “Yes,” here, it’s going to pop open a screen.
This is the body of the email that’s going to go out to all of our customers. We can see here, again, a little bit of additional functionality beyond the out of box functions and features. Here, again, we have some of those dynamic fields, so I can say, “Thanks for being a valued client of ERP Connect Consulting. Please find our invoice number attached for the client’s name. Here’s the amount due and here’s the due date.” Some very simple yet effective information going out in the email body directly to our customer, and I’ve got my signature here for now. I can click on this logo, it’s going to bring me out to my company website. You can book a meeting, you can see all of our social media links down here. A lot of powerful things you can embed directly in the email body with links, with images. Pretty much anything you can think of that you could send in a normal email, you’re able to embed directly here.
I’m going to go ahead and close that. Finally, we got the summary note. If you want to add any additional notes or things to the invoices, you can do so here, and those will be included when using the tool as well. We already talked about the email upon posting, I’m going to actually turn that on, and we’re going to demo that live here in a second. In the general overview, we’ve gone through all the different invoice fields here, and now we’re actually going to go out, create an invoice, post it, and show you what that looks like when it comes into someone’s inbox. If I come back here… You’ll notice that my home screen looks a little different, as well. We did the search before, we went up to ISD. That’s a great way to find things, you can see everything here. What we’ve also done here is we’ve set up a role center, so if you come here, you see this, “Accounts Receivable,” role center. That’s actually a custom role center for ISD specifically, and what you’ll notice is that, up top here, we have all of our favorite dashboards here.
We’ve also got, “Customer Aging,” for the ISD piece here. You can see, if you click in, it’s going to show you the different buckets for the different folks, and it’ll give you, at all times, up-to-date details on those different aging buckets. We’ll come back to this Invoice Delivery Dashboard after we post the invoice, but what I want to show first is this sales invoice auto-post. We come down here to the sales invoices. We got a few, but I’m going to create a new one. I’m going to pick my first customer here, it’s going to populate everything, as a normal sales invoice would. We’re going to sell them a couple of computer monitors today, we’ll sell them two computer monitors. Each monitor’s 300 bucks, for a total of 600. Everything’s good to go now, I’m going to come up here, and click, “Post.” When I click post, what this is going to do is it’s going to fire everything off just like normal. It’s going to say, “Okay, you want to see the invoice?”
Sure, I can take a look at it. This is what the posted invoice looks like. I’m going to come back to my homepage, what I really want to take a look at are these different emails that I just got sent. I’m going to come in here, I’m going to look at this email, and we can see, exactly from my template, what this looks like. We got, “Please, find posted invoice for the client name.” Here’s the amount due, 600, and the due date is 8/21, so payment terms must be like net seven, or something. If I go ahead and click on the invoice here, we can see… All right, we’ve got all of our client information, we got our company information, payment details, all that good stuff right here. The client now has that in their inbox. Again, it sent it to me, because I use that test email in our setup, but in a real-world scenario, what this would do is it would send it out directly to the customer’s email that you have on the customer file.
We talked about those email attachments in the dashboard. We didn’t actually send any attachments here, I want to add an attachment after the fact, and go ahead and send it again. What I can do is I can come up to this Invoice Delivery Dashboard and we’re going to see a few more things. The first thing to note is you can see the delivery status. This is the one we just sent at 4:30, it’s 4:31 now on my clock. You can see that a bunch of these others are pending, which means I haven’t sent them yet when I was testing previously. I probably didn’t have that auto send on, which is fine, that’s exactly what this dashboard is for. If I click on this, it’s actually going to bring me into the document. One thing I mentioned before was those attachments, if I come over here on the attachments and I click this zero, I can attach files as normal. I’m going to attach some time entries for this week.
All I need to do is include the emails in the ISD, click, “Close,” and now, if I were to come up here and do this manually in the future… What I can do is come up here to click, “Print, send. Send email.” Just like last time, it is going to send me those documents. The only difference we’ll see this time now, once it comes in here to my inbox, we will see, additionally, a time entry attachment. We just attached that in the ISD tool, now anytime that those emails are sent out, it’s going to include both the invoice, as well as the attachment that we just created. This should be a test Excel document, but you can see over here, it attaches the Excel file for them, so maybe you want to send the invoice and you want to send supporting time entries.
That’s exactly what this will do and it’ll allow you to send those both at the same time. Let’s jump back into Business Central. The other thing we can do, rounding things out from the ISD setup… If we come over here, we can set the invoice sent. We saw that a lot of those were pending, maybe we want everything to update to a status assent to indicate that we’re up to date. If I come back here, what that’s going to do is indicate everything as emailed. Maybe I sent it manually, maybe we’re getting caught up for the week, what that’s going to do is, essentially, change the delivery status, so that everything’s in the same state. All right. We’re going to go back to the setup, finalize talking about our invoices, and move to credit memos. We’ll come here. Talked about everything up here on the invoice, talked about email upon posting, and also showed how you can email those from a dashboard.
The next thing we want to talk about is credit memos. Not going to spend a whole lot of time on the credit memos, because honestly, they’re going to work almost identically to the invoices. You’re going to have a CC address, you’re going to have a Report ID filter, you’re going to have your Email Subject with those wild cards, where you can dynamically bring in data for the company name, the credit memo number, and the client number or name. We have our email body. Again, I’m going to click here. The only thing different, in this case, is it’s going to indicate that we’re receiving a credit memo for a client for the amount credited, rather than, in this case, an invoice, as we saw last time. Again, you can include any images, you can include your logo tied to your website, and you can include social media links. Anything that you can think of in an email, you can embed here and put links behind the images, like we see here currently.
Again, of course, we have our Email Upon Posting, which I can turn on here. Anytime I create and post a credit memo, it’s going to automatically send that credit memo and all the underlying details, as well as the PDF, out to the client. Otherwise, if I go back to my homepage or my search, I also have a Credit Memo Dashboard. What this Credit Memo Dashboard’s going to do, it’s going to look almost identical to that Invoice Dashboard, it’s going to show me what was delivered, what’s still pending, when it was sent, whom it was sent by, and again, some more details around those credit memos in the system. We’ll jump back into ISD. Like I said, we already went through that end-to-end on the invoice side, and it’s going to work identically on the credit memo side. The next thing we want to talk about, though, is the payment receipts.
If I come down here to the payment receipts, we’re going to see some familiar fields. We got our CC address, which is always going to send everything to me on a copy of the customer that I’m sending to, we’ve got the email subject, in this case it’s going to show… Again, if I hover over… Okay, one is the company name, two, the payment receipt for the payment receipt number, and three, who that payment receipt’s for. If I come into the email body and click, “Yes,” here, it’s going to show, “Okay, we got payment receipt 1234 for the client. This was the amount received.” This payment receipt, what it’s good for, is really closing the loop. You’re going to be sending invoices out to your customers, your customers are going to be sending back their payments, and then you’re going to be taking those payments, recording them in Business Central, and ultimately applying them to an open invoice that you had previously sent.
What this payment receipt’s going to allow you to do is automatically send the receipt of these payments back to the customer to say, “Hey, Customer. We’ve received your payment, we’ve entered it into our system, and here’s what we applied it to.” Again, the same logic applies throughout this tool. We can either email upon posting, or we can go ahead and post from that dashboard. Again, you can post these one by one, you can post them in bulk, or however you see fit. We’ll do another demo here, I’m going to turn this on, we’re going to go back into our homepage, and go to out-of-box cash receipt. If I come down to my cash receipts journals, I’m going to pay that invoice we just created for that customer, we’ll come in here into the applies, and I believe it was one of these $600.
We’ll go ahead, create a payment for $600 from our customer, and we’ll go ahead and post that now. “Journal lines were successfully posted,” fantastic. Before I could even pull it over here, we got that email in our inbox. It’s saying, again, “Thanks for being a valued client. Please, find our payment receipt for (the client name). We received $600.” If I click on this attachment, what it’s going to do is it’s going to pull up some information. It’s going to say, “Hey, this was the date it was received, this is the invoice it paid off, and it was for $600.” Again, a great way to bring that full circle. This isn’t available with the current code base in Business Central, that’s why we added it into our extension, so that you really can bring that collections and AR process full circle, keep your customers in the loop of things that are happening, and that payments were received, so they know that they don’t have to worry about it on their side, as well.
All right, let’s go back into the ISD setup. We’ve now talked about invoices, we’ve talked about credit memos, and we’ve talked about payment receipts. The next function in the tool to stay in touch with your customers and make sure that payments are being received in a timely process, is statements. We’ve got statements as an out-of-box report from Business Central. What this is going to do, in terms of additional functionality, is allow you to do two things. The first is it’s going to allow you to send statements on a regular cadence. What we mean by that is we can schedule these statements to be sent out weekly, or we can schedule them to be sent out on the last day of the month. What this is going to do is it’s going to take, at that point in time, a filter to look at everything that’s open for the customer, based on the day that it’s being run, and list all of the invoices that are currently outstanding for that customer in their statement.
All of those might not necessarily be overdue, but it’s going to indicate, “Okay, these are still current, these are overdue,” with a nice little paging at the bottom of the statement. Again, I can CC myself when those go out, I can put the subject, “Hey, here’s the customer statement,” and I’ve got another email body here that I can say, “Please, find your August statement,” for example, “Attached for the customer.” We’re going to go send this out right now and I’ll show you exactly what that looks like here in a second. The other important thing to mention is, if I actually look at my customer card, for example, that’s where I’m going to indicate how I want those statements to be sent. In this case, I’ve got my statement delivery option as, “Statement, separate files.” What, “Statement, separate files,” is going to do, is it’s going to send me my statement and then, in separate files, it’s going to send me every invoice that’s on that statement.
I could also do consolidated files, which are going to give me one PDF with all of the invoices that are open, I could do statement only, which is going to give me just the statement and no invoice copies, or I can say, “No statement.” If I say, “No statement,” it’s basically going to ignore the ISD tool if I try to send statements, because this customer says, “We don’t send those statements.” I’ve got my AR email going to myself, so in this case, that would actually be your customer email, that you want those to go to. Again, in this case for the demo purposes, I’m going ahead and sending everything out to myself.
Let’s go back to that homepage and go to our Statement Dashboard, in this case. If I go ahead now, process, and click, “Send statement email…” Again, I’m just doing one right now, but you could select all these, and it would send everything all out at once. All I have to do is click, “Yes.” You skip all the dialogue boxes of, “Hey, how do you want this email to look?” Things like that, so it’s very streamlined. If I come back over to my email here, we should see an email. Perfect, come through right there. 4:40, 4:41. Pretty real time, in this sense. Again, it’s going to say, “Please, find your August statement attached for,” the client name. I got all my signature stuff down here, all the links are clickable, and I’ve got all my attachments. If you remember, on the customer card, I had a statement with the invoice detail here. If I go ahead and click on my statement, you’ll see… Okay, I’ve got my statement.
These are the two invoices that the customer currently has. In this case, both are current. We’ve got a due date of 8/21, and today’s only the 14th, so those are well within the realm of being current. You can see that, down here, we also have a quick aging summary that they can also take a look at. In this case, we’re just sending them a notice that “Hey, these are the two invoices that you should currently have on file that are open.” It’s important to note that it’s only going to show invoices that are still open. We don’t want to bog it down with all the noise of every invoice that they’ve ever received. In addition to that, we’re also going to copy both of the invoices that we sent. Again, you can see this copy here and we got the 250 and the 600. In this case, the customer has full visibility, on a monthly basis, that can go out automatically on a job queue, showing them the statement at the end of the month, and all of the invoices that are included in that statement.
That’s a cadence. It’s going to be sent to the customer regularly on a cadence that says, “Hey, here’s everything that you have open.” The last thing that we want to show on the ISD tool, if we go back to the setup… Again, for the statements, there’s no email upon posting, because there isn’t a posting activity necessarily. We can run those from the dashboard, as we just saw, or we can schedule them. The last thing that goes hand in hand with the statements is the past due reminders. The first thing you’ll see here is, “Send reminder emails.” You can toggle this either on or off, we’re obviously going to have it on for today’s demo purposes, but this allows you to do two things. We have an email date formula, and an email interval to get started.
What this is going to do is, the first email that goes out… You’ll see we have a first email subject, and first email body, as well as a follow-up. The first email that goes out is going to be more indicating that, “Hey, you have an invoice that is due in a few days,” that’s what this date formula is going to do. In our case, we want to say, “Minus two D,” so two days before that invoice is due, we want to send an email to the customer that says, “Invoice 1234 is due on,” the date that it’s due on. In the email body, if I click on, “Yes,” here… Again, similar functionality, you’ll see, “Your invoice 1234 for $500 is due on the 21st,” maybe. After that, what we want to do is send an email every seven days until that invoice has been paid and everything’s come to a closed status.
In this case, now we have a second email that’s saying, “Okay, we sent our email already telling the customer that the invoice is due in a couple of days,” then seven days after that, seven days after that, and continuing on that cadence until it’s paid, we’re going to send another email that says, “Past due notice. Invoice 1234 was due on,” someday in the past. In this case, you can put whatever verbiage you’d like in here. The verbiage we put for our test was, “Your invoice number 1234 for $500 was due on August 1st,” maybe. In this case, 14 days ago, “Please, make sure to make prompt payment in order to avoid late fees or suspension of service,” or whatever verbiage you want here. Again, you can put any logos, pictures, or even payment links here, so that they can directly pay you on your payment portal.
A lot of different functionality here that you’d be looking to help with that dawning process, help with that collections process, and sending out automatic reminders to tell your customers, “Hey, these invoices are either coming due or they’re overdue.” Again, we can do this from a dashboard, if you want to send it one time, or you can send it automatically in a job queue, where at the end of every day, it’s going to look for everything that fulfills these criteria and it’s automatically going to send those emails out for you. If I come back here, the last thing we have not looked at so far is this Invoice Reminder Dashboard. What this Invoice Reminder Dashboard is, is exactly what we’ve been talking about. You can see this Reminder Email Sent Date. In this case, we sent an email today and we sent two emails towards the end of last week.
Again, what this is going to do is it’s going to use those formulas two days prior, or seven days past, to automatically send emails. I’m going to put my work date here, into the future a little bit, so that we can simulate what this would look like. In this case, the invoice has already been sent, but we do want to go ahead and send another email. We can actually send both from here, we can send the original invoice, if we haven’t sent it already, and we can send the reminder. Of course, if we haven’t sent the original email, we can’t send a reminder, because there’s nothing to remind them about, so that’s why we have both functions here. If you haven’t sent the email yet, just go ahead and send the email, and after that, you can go ahead and send the reminder. Again, we would typically automate this, so that it would look at the end of every day to see what’s still open, and then send those emails out accordingly.
What you can see here is I’ve got a past due notice. Invoice 103241 was due on 8/15. Again, remember, I set my work date into the future, so we could simulate this. What this is going to do is it’s going to put in, “Hey, your invoice for $4,593 was due on 8/15. Please, make prompt payment in order to avoid the suspension of your service or a late fee.” Here, again, it’s going to include those attachments to show them the invoice. You can include payment links here or, really, anything else that’s needed, in order to facilitate them paying that invoice in an easier manner. Let’s finally go back into our ISD tool just to round things up. So far, we’ve talked about the invoices. Again, we can send those both directly when they’re posted or from a dashboard. Credit memos, same thing as invoices, we can send upon posting or send from a dashboard. Payment receipts, as our customers are paying us and we post those payments, we can email our customers, “Thank you, your payment has been received. Here’s what it was applied to.”
Finally the last two pieces. We have our statements and our past-due reminders. These can be used hand in hand to communicate with your customers on a regular basis that payment is coming due, payment is overdue, send them a general statement or summary at the end of the month showing them all of the invoices that are due, and giving them links in order to make easy payment, so that you can ensure that your days to collect stays low and that we don’t have a lot of invoices that are just sitting out there as open in AR that aren’t being collected on. This really helps automate that process for your AR department and really helps make their job easier, so that they’re not having to do all of this manually, and it can be automatically sent out of the system.
Looking at that, the only last thing we have is this, “Export/Import” feature. If you’re in test right now, you’re finishing things up, and you have all of your email templates perfect, what you can do here is you can export those templates, and then you can import the same template into a production environment. That way you don’t have to recreate everything. This allows you to easily export those XML files and import them back into a different environment, where either you’re moving for production or maybe you’re in production, you want to export something so that you can put it in a test environment, and make sure that the test is sufficient before you deploy it. Looking at ISD, overall, we can see here that there’s a lot of efficiency put in place by using this tool, whether that’s saving time for sending emails, either from posting or from a dashboard, or just simply extending the current out-of-box functionality that sometimes can be slow and mundane, and lots of click-thrus from those dialogue boxes.
Trying to really enhance that user experience here with the Invoice and Statement Delivery tool. We hope you liked what you saw in this video. If you have any other recommendations for future features, we would love to hear from you. As always, if you have any custom extension requirements or requests, please feel free to reach out to our team at any time. If you need any help or training in addition to this video, please, also feel free to reach out. We hope you enjoyed the video and we look forward to hearing from you soon. Thank you.